SHARP CORNER POINTS MADE EASY

Binky Brown Takahashi, Quilt Nouveau Designs

The secret to making perfect and sharp points in the four corners of the Floral Reflections blocks, is to catch the seam allowance at the end of the leaf (or the calla lily) into the seam allowances of the background triangles. A perfect point is created without needleturning the edges under.

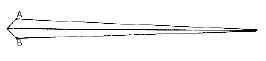
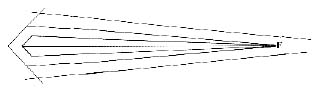
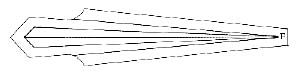
In some cases, you might want to catch nearly the full length of the leaf piece, if it is narrow and straight (such as the bachelor buttons, the orchids, the fuchsias, the daffodils, the morning glories, the wild irises,and the desert aureas. Even the winterberries can be modified to use this method).

To do this, you will want to add more than just seam allowance to make your new pattern piece. You will need to double the size of your original pattern piece, plus 1/4 " seam allowances. The extra fabric that you add becomes the folded underside of your leaf.

1. Draw a line down the center of your leaf shape.
2. Measure distance AB. Now make a dot that same distance away from the center line
3. Add a generous 1/4" seam allowance around the whole pattern piece.
4. Trim the tip at F to 1/4" from the leaf point. Now trim the wide end, as shown, to avoid bulk in the center of your block. The leaf will not be caught in the background seams at this wider end.
5. Cut out your leaf piece on the bias. Fold the leaf in half(wrong sides together). Place it between two of the background triangles and pin. Be sure that you have marked the location of the end of the points on the background fabric, so all of your points match when you have finished. Stitch through all layers. Press.
6. Use traditional piecing and applique techniques to finish the leaves where they meet in the center of the block. When you sew the four leaf pieces together in the center, do not stitch into the 1/4" seam allowance ( beyond points A and B) or you will have problems turning under your side seam allowances.
7. Remember, any time that you want to catch just the end of a point into the background fabric,(the calla lilies and the ranunculuses), you will need to allow more than 1/4" seam allowance at the end of the pattern piece. You must allow enough fabric for the folded underside of the shape, then 1/4" for seam allowances. Applique the rest of the shape as usual.
Additional helpful hints:
1. Applique the flowers and side leaf pieces to your 4 seperate background triangles first, then sew the pointed corner pieces into the background seams.
2. If some pieces seam too small:
a. Add that piece to an adjacent piece and make one larger piece out of the two.

b. Use embroidery stitches or French knots instead of a small piece.

c. Applique most of the piece in place and then use a small buttonhole stitch to finish off the edge of the difficult part of the shape. You don't need seam allowance where you buttonhole the edge, if your stitches are small.

3. It is OK to round off a point or smooth out a leaf. Make these patterns work for you.
4. I like to add 1/16" of an inch extra around my shapes, so that they don"t shrink up too much as the edge is rolled under. I just cut on the outside of my cutting lines when I cut out applique pieces.